What is R? 🤔
R is much more than just a statistical software! It’s a complete programming language and environment designed for:
- Data analysis and statistics
- Data visualization
- Machine learning
- Report generation
- Web applications
- Geographic Information Systems (GIS)
- And much more!
Real-World Applications in Fisheries
- Analyzing catch data
- Creating automated reports
- Making interactive dashboards
- Mapping fishing grounds
- Population modeling
- Image analysis (e.g., fish identification)
- Environmental data processing
Pros of R? 🎯
- Free and Open Source
- No license costs
- Community-driven development
- Transparent methods and algorithms
- Huge Community
- Over 19,000 packages available
- Active support forums
- Regular updates and improvements
- Reproducible Research
- Code documents every step
- Easy to share and verify methods
- Perfect for scientific publications
- Versatile
- Works on all major operating systems
- Handles various data formats
- Integrates with other tools
Installing R and RStudio 💻
Step 1: Install R
First, you need to install R itself:
- Go to CRAN (The Comprehensive R Archive Network)
- Click on the link for your operating system:
- Windows: “Download R for Windows” → “base” → Download the .exe file
- Mac: “Download R for macOS” → Select the appropriate version
- Linux: Choose your distribution and follow the instructions
Installation Tips
- Windows users: Install R in the default directory (usually C:Files)
- Mac users: You might need administrator privileges
- Linux users: Consider using your package manager (apt, yum, etc.)
Step 2: Install RStudio
RStudio is an Integrated Development Environment (IDE) that makes working with R much easier:
- Visit RStudio Downloads
- Scroll down to “RStudio Desktop”
- Download the free version for your operating system
- Install following the default options
Important
Always install R first, then RStudio. RStudio needs R to work!
Understanding RStudio’s Interface 🖥️
RStudio has four main panels (clockwise from top-left):
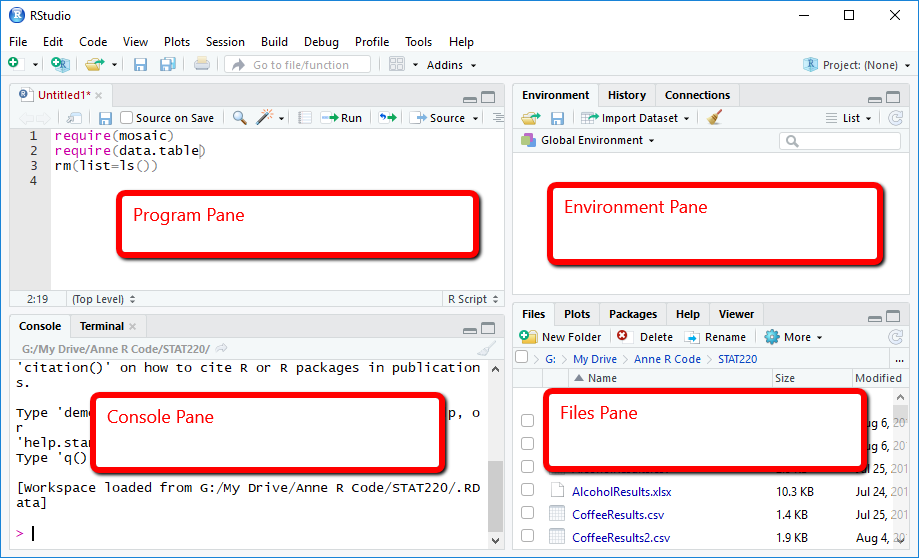
- Program Pane
- Where you write and edit your code
- Create and modify R scripts
- Write R Markdown documents
- Environment/History
- Lists your current objects and data
- Shows command history
- Manages connections
- Files/Plots/Packages/Help
- Browse files and folders
- View plots
- Install and load packages
- Access documentation
- Console
- Run R commands directly
- See output and messages
- Test quick calculations
Creating Your First R Project 📁
Projects help organize your work and make it portable. Here’s how to create one:
- In RStudio, click
File → New Project - Choose
New Directory - Select
New Project - Fill in:
- Directory name (e.g., “my_fisheries_analysis”)
- Where to create the project
- Click “Create Project”
Understanding Project Structure
A well-organized project should have these folders:
my_fisheries_analysis/
├── data/          # Raw data files
│   ├── raw/      # Original, unchanged data
│   └── processed/ # Cleaned and processed data
├── R/            # R scripts
├── outputs/      # Results, figures, tables
│   ├── figures/  # Plots and visualizations
│   └── tables/   # Generated tables
└── docs/         # Documentation and reports
Best Practices for Project Organization
- Keep raw data separate and unchanged
- Use relative paths (project root as reference)
- Name files and folders consistently
- Include a README file explaining the project
Your First Task: Setting Up Your Environment 📋
- Install Required Software
- Download and install R
- Download and install RStudio
- Test that both are working
- Create Your First Project
- Open RStudio
- Create a new project called “ssf_analysis”
- Set up the folder structure as shown above
- Verify Your Setup
- Open RStudio and create a new R script
- Save it in your R folder
- Try this simple code:
Troubleshooting Common Issues 🔧
Problem: R/RStudio Won’t Install
- Check system requirements
- Run installer as administrator
- Clear temporary files and try again
Problem: Can’t Create Project
- Check write permissions in target directory
- Close other RStudio instances
- Restart RStudio
Problem: RStudio Doesn’t Find R
- Reinstall R first, then RStudio
- Check if R is in system PATH (Windows)
- Verify R installation directory
Next Steps 🚀
After completing this setup: 1. Explore RStudio’s interface 2. Try creating and saving some R scripts 3. Practice navigating your project structure 4. Get ready for data import and analysis!
Additional Resources
Remember: Taking time to set up your environment properly will save you hours of frustration later!
Next: Basic Operations